


Concrete Overlays
Installation Process
Overlays | Installation Process | Design Factors | Success Story | Ultra-Thin Overlays
Step 1: Pre-overlay preparation
 Evaluate the existing pavement and prepare the design of the concrete overlay. To ensure that the concrete overlay performs properly, the factors that caused deterioration of the existing asphalt pavement need to be corrected or recognized in the design. Failures can be attributed to drainage problems, traffic, subgrade condition, inadequate pavement section, poor construction, inadequate mixtures, or sub-standard materials.
Step 2: Design
Once the existing site conditions have been analyzed and the factors that contributed to the failure of the existing pavement determined, the design of the parking lot overlay can begin. The thickness of the new concrete surface is determined by the type and volume of traffic expected, the strength of the existing pavement, and the material properties of the concrete used. The average whitetopping overlay is placed at a thickness of 4-6 inches.
The concrete used for overlays can be either a standard or fast-track mix. Fast-track mixes are specified for projects that must be completed and accessible in 24 to 36 hours.
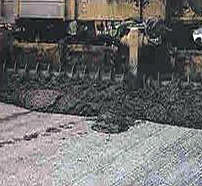
Step 3: Surface Preparation
 This involves correcting surface distortions and sweeping to re-move all loose particles. If large potholes exist in the underlying blacktop, these should be filled with gravel and crushed stone and hand-tamped in place. This will provide a reasonably level surface and prevent variations in concrete slab thickness. If deep ruts exist in the asphalt surface, these should also be leveled by cutting off the high spots and filling the low to provide an even surface.
During hot summer months, the temperature of the asphalt pavement should be monitored to guard against heat build-up, which can cause severe curling of the overlay. If the asphalt is uncomfortable to the touch, it should be lightly sprayed with water in order to cool it down and prevent it from drawing water out of the concrete mix.
A whitewash may be necessary for overlay projects in which a leveling course is placed. By providing a white surface that will not absorb heat, whitewashing prevents heat from building up in an existing black surface or leveling course.
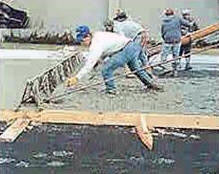
Step 4: Placement
There are various acceptable procedures for overlays on parking areas and roads. For parking areas, equipment ranging from simple hand screeds and floats to slipform paving machines can place, compact, and finish concrete paving.
Choose construction methods based on the project size and availability of equipment. Once the equipment has been selected, the paving sequence and jointing plan should be developed to assure a smooth construction operation. On small jobs, the concrete placement sequence is not as critical as it is on larger jobs, where it may be more effective to place the concrete in alternate lanes.
Place the concrete to at least the minimum thickness shown on the plans. Deviations for profile adjustments or cross-section adjustments should be above the suggested thickness. Some contractors may use computer soft-ware programs to calculate grade adjustments. The concrete should be poured from the ready-mix truck directly onto the blacktop, at the specified slump.
Step 5: Texturing and Curing
Avoid overfinishing slabs. For interstate and other primary roads, lining provides long-term skid resistance. For parking areas and low-speed municipal/urban projects, a burlap drag, broom, or astroturf drag are sufficient.
After the surface has been textured, apply curing compound at the specified rate to avoid moisture loss and the development of shrinkage cracks. The compound should not run or puddle on the surface. A liquid-membrane curing compound is usually recommended as the most cost-effective curing agent.
Step 6: Jointing
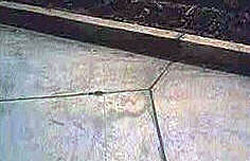 The depth of saw cut for transverse joints should be no less than ⅓ the nominal overlay thickness. For example, if the overlay is 6 inches thick, the saw cut should be at least 2 inches. A deeper cut should be made where the overlay thickness varies by more than 1 inch over the nominal thickness.
Joint spacing on overlay projects are approximately the same as that for conventional concrete pavements. The maximum jointing interval (in feet) should not exceed twice the slab thickness (in inches). For example, an 8-inch thick overlay slab should not be jointed at intervals of more than about 16 feet. Joint spacing can also be based on that of local pavements which have provided reliable service.
Step 7: Opening to traffic
For standard concrete overlay projects, all vehicular traffic should be kept off the pavement for three days, or until site-cured cylinders attain a compressive strength of 3,000 psi.